
The first few projects had some snags, but in the end, with trial and several errors, have worked out quite well. First – the adobe oven.

-
- Base with the top layer of fire brick on – ready for our sand form
-
- Sand form for adobe oven
-
- There are two of these cracks that threaten the integrity of the oven
-

- Decorations attached
-
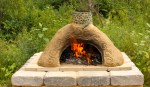
- Nice fire!
This was the first attempt at building a structure of this type and although there was some pretty heavy lifting, it wasn’t hard to do. We discovered three huge rock piles on the property. Two of them are on the other side of the road, but one is right here by our big field. Farmers have been pulling rocks from this field for many, many years and I don’t think we are done. This field, as many others do, seem to grow rocks like potatoes. I figured it was good to use some of those.
First, the base is made by stacking 4″x 4″x 4′ posts in a square on a fairly level base of gravel. I drilled holes in the corners and stuck some re-bar in there to hold it steady for the next step. I made our 3.5′ high because we are tall people – you may want to make yours shorter. The thinking is, when you spend three plus hours heating it up for use, you may want to use it for several baking projects, like breads first, then pies and pastries, then roasting meat and vegetables as the oven cools some. So if you are using the oven all day, you don’t want to be bending over to use it. Keep this in mind when building yours.
Then we filled it full of large rocks – the ones we found in our pile. Some of those were as big as my head! So this is where the heavy lifting came in. Luckily we didn’t have to cart them far, just into my wheelbarrow type trailer that attaches to my little tractor and then out again at the oven site.
Then we got out our shovels to cover the bin of rocks with dirt. We used twigs to poke down between the rocks to make sure it was shifting all the way to the bottom and just kept adding dirt until we felt it was sturdy.
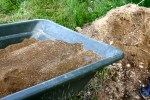
Next, after making sure it was pretty level (Rob hates it when I tell him I ‘eyeballed it’!) we covered it with a layer of sand to make a flat surface to lay the bricks. We chose heavy flagstone for our first layer. Then another layer of sand, mostly to fill in the cracks and prevent any shifting. We dusted the top with more sand to give some security to our firebricks that come next.

Base with the top layer of fire brick on - ready for our sand form
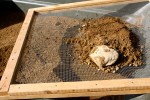
Then came our sand form.
The sand form is needed to support the clay walls while the clay is wet. I made this sand form a little small for what I wanted, but at the time it looked almost too big. The sand is quite wet – a little wetter than you would use for a sand castle at the beach – only because you need it to get tall and the wet helps that.

Sand form for adobe oven
The sand form is then covered with newspaper. This is not really necessary for the structure, but it sure does help when it comes time to hollow out the sand. You stop scooping out sand when you reach the newspaper. It is also not necessary to remove the paper as it will burn off in the initial fire. Another tip: it is much easier to cover it with wet newspaper. The dry will fly off in the slightest breeze and make layering it next to impossible.
Now you have a good solid base for the clay.
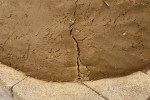
Our soil has a high clay content so using our clay was a no brainer to me. It stuck together well when moist and I initially thought there was enough sand in it to prevent cracking during the drying process. Turns out I was wrong about that, but the clay was terrific! Next time, I will mix 1 part sand to two parts of our soil and it should solve the cracking problem. A few of our drying cracks were just superficial and not at all harmful to the structure of the oven itself, but two of them were quite significant. These two had smoke coming out of them. Also, after having a few curing fires in this lovely oven, I have decided that the walls aren’t nearly thick enough. They are roughly three inches thick and I believe four and a half would work much better. The walls need to be thick to hold on to the heat for hours at a time. Mine are cooling too quickly, making a constant temperature inside the oven somewhat of a pipe-dream.

There are two of these cracks that threaten the integrity of the oven
Anyway, I’ve gotten ahead of myself. The clay we used was mixed with a three gallon bucket of straw cut up into finger lengths to help bind it together after it dries, then with enough water to make it like mud. It felt really good to get in there with my feet to mix it around, but not as effective as using a shovel and turning each scoop back into the pile.
I added the clay to the base starting at the bottom and working up. I made sure the first layer had lots of texture so that the second layer would have something to grab onto. Three layers later, I cut out the door. This is our final view before I hollowed out the sand.

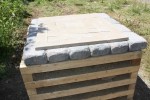
Decorations attached
Now with the sand still in there, I let it dry for three days with a tarp over it to prevent sun from beating down and evaporating the water to fast. Then hollowed it out and another three days of drying under a tarp. The cracks were really tiny then and I tried to patch them before we lit our first fire. Unfortunately, they were too severe and shrunk up a bunch to make these large cracks. The cracks didn’t effect the size of the fire, though. It burned beautifully!

Nice fire!
So, to recap, I loved the process of building this fire. I am either going to tear it down and build another, taller, with more sand in it and thicker walls, or I will repair this one. I am thrilled with the way the inner walls turn a lovely terracotta pink after a few fires. I will, either way, be building more adobe ovens, and will definitely be baking bread in them.
